mirror of
https://github.com/AderKonstantin/aderktech-chronark.com-.git
synced 2025-06-08 21:58:41 +03:00
Compare commits
3 Commits
12d9ec90a1
...
4283932d9e
| Author | SHA1 | Date | |
|---|---|---|---|
|
|
4283932d9e | ||
|
|
9a576d9352 | ||
|
|
7597a8e2b8 |
27
Dockerfile
Normal file
27
Dockerfile
Normal file
@ -0,0 +1,27 @@
|
|||||||
|
# Stage 1: Build the application
|
||||||
|
FROM node:23-alpine AS builder
|
||||||
|
|
||||||
|
WORKDIR /app
|
||||||
|
COPY package*.json ./
|
||||||
|
RUN npm install
|
||||||
|
COPY . .
|
||||||
|
RUN npm run build
|
||||||
|
|
||||||
|
# Stage 2: Run the application
|
||||||
|
FROM node:23-alpine AS runner
|
||||||
|
|
||||||
|
WORKDIR /app
|
||||||
|
ENV NODE_ENV production
|
||||||
|
ENV NEXT_TELEMETRY_DISABLED 1
|
||||||
|
|
||||||
|
RUN addgroup --system --gid 1001 nodejs
|
||||||
|
RUN adduser --system --uid 1001 nextjs
|
||||||
|
|
||||||
|
COPY --from=builder --chown=nextjs:nodejs /app/.next ./.next
|
||||||
|
COPY --from=builder /app/node_modules ./node_modules
|
||||||
|
COPY --from=builder /app/package.json ./package.json
|
||||||
|
COPY --from=builder /app/public ./public
|
||||||
|
|
||||||
|
USER nextjs
|
||||||
|
EXPOSE 3000
|
||||||
|
CMD ["npm", "start"]
|
||||||
14
README.md
14
README.md
@ -31,3 +31,17 @@ pnpm dev
|
|||||||
## Cloning / Forking
|
## Cloning / Forking
|
||||||
|
|
||||||
Please remove all of my personal information (projects, images, etc.) before deploying your own version of this site.
|
Please remove all of my personal information (projects, images, etc.) before deploying your own version of this site.
|
||||||
|
|
||||||
|
|
||||||
|
## Docker
|
||||||
|
|
||||||
|
First of all setup networks:
|
||||||
|
```bash
|
||||||
|
docker network create proxy
|
||||||
|
docker network create backend
|
||||||
|
```
|
||||||
|
|
||||||
|
And then start the stack:
|
||||||
|
```bash
|
||||||
|
docker-compose --env-file .env up -d --build
|
||||||
|
```
|
||||||
|
|||||||
@ -6,24 +6,24 @@ import { Analytics } from "./components/analytics";
|
|||||||
|
|
||||||
export const metadata: Metadata = {
|
export const metadata: Metadata = {
|
||||||
title: {
|
title: {
|
||||||
default: "chronark.com",
|
default: "aderk.tech",
|
||||||
template: "%s | chronark.com",
|
template: "%s | aderk.tech",
|
||||||
},
|
},
|
||||||
description: "Co-founder of unkey.dev and founder of planetfall.io",
|
description: "Junior Dev & Student",
|
||||||
openGraph: {
|
openGraph: {
|
||||||
title: "chronark.com",
|
title: "aderk.tech",
|
||||||
description:
|
description:
|
||||||
"Co-founder of unkey.dev and founder of planetfall.io",
|
"Junior Dev & Student",
|
||||||
url: "https://chronark.com",
|
url: "https://aderk.tech",
|
||||||
siteName: "chronark.com",
|
siteName: "aderk.tech",
|
||||||
images: [
|
images: [
|
||||||
{
|
{
|
||||||
url: "https://chronark.com/og.png",
|
url: "https://aderk.tech/og.png",
|
||||||
width: 1920,
|
width: 1920,
|
||||||
height: 1080,
|
height: 1080,
|
||||||
},
|
},
|
||||||
],
|
],
|
||||||
locale: "en-US",
|
locale: "ru-RU",
|
||||||
type: "website",
|
type: "website",
|
||||||
},
|
},
|
||||||
robots: {
|
robots: {
|
||||||
@ -37,12 +37,8 @@ export const metadata: Metadata = {
|
|||||||
"max-snippet": -1,
|
"max-snippet": -1,
|
||||||
},
|
},
|
||||||
},
|
},
|
||||||
twitter: {
|
|
||||||
title: "Chronark",
|
|
||||||
card: "summary_large_image",
|
|
||||||
},
|
|
||||||
icons: {
|
icons: {
|
||||||
shortcut: "/favicon.png",
|
shortcut: "/favicon.jpg",
|
||||||
},
|
},
|
||||||
};
|
};
|
||||||
const inter = Inter({
|
const inter = Inter({
|
||||||
@ -61,7 +57,7 @@ export default function RootLayout({
|
|||||||
children: React.ReactNode;
|
children: React.ReactNode;
|
||||||
}) {
|
}) {
|
||||||
return (
|
return (
|
||||||
<html lang="en" className={[inter.variable, calSans.variable].join(" ")}>
|
<html lang="ru" className={[inter.variable, calSans.variable].join(" ")}>
|
||||||
<head>
|
<head>
|
||||||
<Analytics />
|
<Analytics />
|
||||||
</head>
|
</head>
|
||||||
|
|||||||
@ -35,14 +35,14 @@ export default function Home() {
|
|||||||
<div className="hidden w-screen h-px animate-glow md:block animate-fade-right bg-gradient-to-r from-zinc-300/0 via-zinc-300/50 to-zinc-300/0" />
|
<div className="hidden w-screen h-px animate-glow md:block animate-fade-right bg-gradient-to-r from-zinc-300/0 via-zinc-300/50 to-zinc-300/0" />
|
||||||
<div className="my-16 text-center animate-fade-in">
|
<div className="my-16 text-center animate-fade-in">
|
||||||
<h2 className="text-sm text-zinc-500 ">
|
<h2 className="text-sm text-zinc-500 ">
|
||||||
I'm building{" "}
|
Основной мой проект сейчас - {" "}
|
||||||
<Link
|
<Link
|
||||||
target="_blank"
|
target="_blank"
|
||||||
href="https://unkey.dev"
|
href="https://cloudberrygames.fun"
|
||||||
className="underline duration-500 hover:text-zinc-300"
|
className="underline duration-500 hover:text-zinc-300"
|
||||||
>
|
>
|
||||||
unkey.dev
|
cloudberrygames.fun
|
||||||
</Link> to solve API authentication and authorization for developers.
|
</Link> предназначен для WebGL игр, сейчас в разработке.
|
||||||
</h2>
|
</h2>
|
||||||
</div>
|
</div>
|
||||||
</div>
|
</div>
|
||||||
|
|||||||
@ -25,9 +25,9 @@ export default async function ProjectsPage() {
|
|||||||
return acc;
|
return acc;
|
||||||
}, {} as Record<string, number>);
|
}, {} as Record<string, number>);
|
||||||
|
|
||||||
const featured = allProjects.find((project) => project.slug === "unkey")!;
|
const featured = allProjects.find((project) => project.slug === "cbg")!;
|
||||||
const top2 = allProjects.find((project) => project.slug === "planetfall")!;
|
const top2 = allProjects.find((project) => project.slug === "blog")!;
|
||||||
const top3 = allProjects.find((project) => project.slug === "highstorm")!;
|
const top3 = allProjects.find((project) => project.slug === "bimkaspace")!;
|
||||||
const sorted = allProjects
|
const sorted = allProjects
|
||||||
.filter((p) => p.published)
|
.filter((p) => p.published)
|
||||||
.filter(
|
.filter(
|
||||||
@ -48,10 +48,10 @@ export default async function ProjectsPage() {
|
|||||||
<div className="px-6 pt-20 mx-auto space-y-8 max-w-7xl lg:px-8 md:space-y-16 md:pt-24 lg:pt-32">
|
<div className="px-6 pt-20 mx-auto space-y-8 max-w-7xl lg:px-8 md:space-y-16 md:pt-24 lg:pt-32">
|
||||||
<div className="max-w-2xl mx-auto lg:mx-0">
|
<div className="max-w-2xl mx-auto lg:mx-0">
|
||||||
<h2 className="text-3xl font-bold tracking-tight text-zinc-100 sm:text-4xl">
|
<h2 className="text-3xl font-bold tracking-tight text-zinc-100 sm:text-4xl">
|
||||||
Projects
|
Проекты
|
||||||
</h2>
|
</h2>
|
||||||
<p className="mt-4 text-zinc-400">
|
<p className="mt-4 text-zinc-400">
|
||||||
Some of the projects are from work and some are on my own time.
|
Часть проектов делал из академического интереса, часть мои проекты для себя.
|
||||||
</p>
|
</p>
|
||||||
</div>
|
</div>
|
||||||
<div className="w-full h-px bg-zinc-800" />
|
<div className="w-full h-px bg-zinc-800" />
|
||||||
@ -91,7 +91,7 @@ export default async function ProjectsPage() {
|
|||||||
</p>
|
</p>
|
||||||
<div className="absolute bottom-4 md:bottom-8">
|
<div className="absolute bottom-4 md:bottom-8">
|
||||||
<p className="hidden text-zinc-200 hover:text-zinc-50 lg:block">
|
<p className="hidden text-zinc-200 hover:text-zinc-50 lg:block">
|
||||||
Read more <span aria-hidden="true">→</span>
|
Подробнее <span aria-hidden="true">→</span>
|
||||||
</p>
|
</p>
|
||||||
</div>
|
</div>
|
||||||
</article>
|
</article>
|
||||||
|
|||||||
@ -1,76 +0,0 @@
|
|||||||
---
|
|
||||||
title: "@chronark/access"
|
|
||||||
description: A minimal library for access control. It is designed to be used together with opaque access tokens by providing a simple interface to define roles with different access permissions and verifying requests to resources.
|
|
||||||
repository: chronark/access
|
|
||||||
date: "2022-11-13"
|
|
||||||
published: true
|
|
||||||
|
|
||||||
---
|
|
||||||
A minimal library for access control. It is designed to be used together with opaque access tokens by providing a simple interface to define roles with different access permissions and verifying requests to resources.
|
|
||||||
|
|
||||||
- Fully typed
|
|
||||||
- Zero dependencies
|
|
||||||
- Serializable to store in a database
|
|
||||||
|
|
||||||
## Install
|
|
||||||
|
|
||||||
```sh-session
|
|
||||||
npm i @chronark/access
|
|
||||||
```
|
|
||||||
|
|
||||||
## Usage
|
|
||||||
|
|
||||||
```ts
|
|
||||||
import { AccessControl, Role } from "@chronark/access";
|
|
||||||
|
|
||||||
/**
|
|
||||||
* Define all your resources and their access patterns
|
|
||||||
*
|
|
||||||
* key => resource
|
|
||||||
* value => array of access types
|
|
||||||
*/
|
|
||||||
type Statements = {
|
|
||||||
user: ["read", "write", "dance"];
|
|
||||||
team: ["read", "write"];
|
|
||||||
};
|
|
||||||
|
|
||||||
/**
|
|
||||||
* Create an access control instance and pass the Statements type to enjoy full
|
|
||||||
* type safety
|
|
||||||
*/
|
|
||||||
const ac = new AccessControl<Statements>();
|
|
||||||
|
|
||||||
/**
|
|
||||||
* Now you can define one or more roles by specifying the access permissions
|
|
||||||
*
|
|
||||||
* This is already fully typed and typescript will let you know if you try to
|
|
||||||
* use anything, that is not defined in the Statements type.
|
|
||||||
*/
|
|
||||||
const role = ac.newRole({
|
|
||||||
user: ["read", "write"],
|
|
||||||
team: ["read"],
|
|
||||||
});
|
|
||||||
|
|
||||||
/**
|
|
||||||
* Simulate storing and retrieving the role in a database
|
|
||||||
*
|
|
||||||
* The idea here is, that you can store permissions alongside an API token.
|
|
||||||
* Now, when you verify the token, you can also verify the access permissions.
|
|
||||||
*/
|
|
||||||
const serialized = role.toString();
|
|
||||||
|
|
||||||
/**
|
|
||||||
* Note how you can pass in the Statements type again, to get full type safety
|
|
||||||
*/
|
|
||||||
const recovered = Role.fromString<Statements>(serialized);
|
|
||||||
|
|
||||||
/**
|
|
||||||
* Validate the role by specifying the resource and the required access
|
|
||||||
*
|
|
||||||
* everything is fully typed
|
|
||||||
*/
|
|
||||||
const res = recovered.authorize({"team", ["read"]});
|
|
||||||
|
|
||||||
// res.success => boolean
|
|
||||||
// res.error => string | undefined provides a reason for failure
|
|
||||||
```
|
|
||||||
23
content/projects/bimkaspace.mdx
Normal file
23
content/projects/bimkaspace.mdx
Normal file
@ -0,0 +1,23 @@
|
|||||||
|
---
|
||||||
|
title: Bimka Space
|
||||||
|
description: Блог и wiki про российский космос.
|
||||||
|
date: "2022-07-18"
|
||||||
|
url: https://bimka.space
|
||||||
|
published: true
|
||||||
|
|
||||||
|
---
|
||||||
|
|
||||||
|
Блог и wiki про российский космос.
|
||||||
|
|
||||||
|
## Built with
|
||||||
|
|
||||||
|
### Frontend
|
||||||
|
- [Next.js](https://nextjs.org)
|
||||||
|
- [tailwindcss](https://tailwindcss.com)
|
||||||
|
|
||||||
|
### Backend
|
||||||
|
- [Golang](https://go.dev)
|
||||||
|
- [Gin](https://gin-gonic.com/)
|
||||||
|
|
||||||
|
### DataBase
|
||||||
|
- PostgreSQL
|
||||||
16
content/projects/blog.mdx
Normal file
16
content/projects/blog.mdx
Normal file
@ -0,0 +1,16 @@
|
|||||||
|
---
|
||||||
|
title: Blog Aderk Tech
|
||||||
|
description: Blog with tech articles.
|
||||||
|
date: "2024-07-18"
|
||||||
|
url: https://blog.aderk.tech
|
||||||
|
published: true
|
||||||
|
|
||||||
|
---
|
||||||
|
|
||||||
|
Блог с техническими статьями по `Linux`, `Docker`, `K8s` и `DevOps`.
|
||||||
|
|
||||||
|
## Built with
|
||||||
|
|
||||||
|
- [Jekyll](https://jekyllrb.com/)
|
||||||
|
- [Chirpy Theme](https://github.com/cotes2020/jekyll-theme-chirpy)
|
||||||
|
- [Gitea Actions](https://docs.gitea.com/next/usage/actions/overview)
|
||||||
@ -1,11 +0,0 @@
|
|||||||
---
|
|
||||||
title: bitofgame.net
|
|
||||||
description: bitofgame.net is an open source API Key management solution. It allows you to create, manage and validate API Keys for your users.
|
|
||||||
date: "2025-07-01"
|
|
||||||
url: https://unkey.dev
|
|
||||||
published: true
|
|
||||||
repository: chronark/unkey
|
|
||||||
---
|
|
||||||
|
|
||||||
|
|
||||||
Unkey is an open source API Key management solution. It allows you to create, manage and validate API Keys for your users. It’s built with security and speed in mind.
|
|
||||||
9
content/projects/cbg.mdx
Normal file
9
content/projects/cbg.mdx
Normal file
@ -0,0 +1,9 @@
|
|||||||
|
---
|
||||||
|
title: Cloudberry Games FUN
|
||||||
|
description: Веб-сайт с WebGL играми.
|
||||||
|
date: "2025-07-01"
|
||||||
|
url: https://cloudberrygames.fun
|
||||||
|
published: true
|
||||||
|
---
|
||||||
|
|
||||||
|
Веб-сайт с WebGL играми, преимущественно сделанными внутренними разработчиками.
|
||||||
@ -1,14 +0,0 @@
|
|||||||
---
|
|
||||||
title: chronark.com
|
|
||||||
description: The website you're looking at
|
|
||||||
repository: chronark/chronark.com
|
|
||||||
url: https://chronark.com
|
|
||||||
date: 2023-03-28
|
|
||||||
published: true
|
|
||||||
---
|
|
||||||
|
|
||||||
|
|
||||||
Like so many others, I just wanted a place to collect some projects I worked on. Maybe I'll add a blog, maybe I won't. I'm not sure yet.
|
|
||||||
|
|
||||||
If you like the design, check out the Repository on GitHub.
|
|
||||||
|
|
||||||
@ -1,116 +0,0 @@
|
|||||||
---
|
|
||||||
title: envshare.dev
|
|
||||||
description: EnvShare is a simple tool to share environment variables securely. It uses AES-GCM to encrypt your data before sending it to the server. The encryption key never leaves your browser.
|
|
||||||
date: "2023-01-16"
|
|
||||||
url: https://envshare.dev
|
|
||||||
repository: chronark/envshare
|
|
||||||
published: true
|
|
||||||
---
|
|
||||||
|
|
||||||
EnvShare is a simple tool to share environment variables securely. It uses
|
|
||||||
**AES-GCM** to encrypt your data before sending it to the server. The encryption
|
|
||||||
key never leaves your browser.
|
|
||||||
|
|
||||||
## Features
|
|
||||||
|
|
||||||
- **Shareable Links:** Share your environment variables securely by sending a
|
|
||||||
link
|
|
||||||
- **End-to-End Encryption:** AES-GCM encryption is used to encrypt your data
|
|
||||||
before sending it to the server
|
|
||||||
- **Limit number of reads:** Limit the number of times a link can be read
|
|
||||||
- **Auto Expire:** Automatically expire links and delete data after a certain
|
|
||||||
time
|
|
||||||
|
|
||||||
|
|
||||||
|
|
||||||

|
|
||||||
|
|
||||||
## Built with
|
|
||||||
|
|
||||||
- [Next.js](https://nextjs.org)
|
|
||||||
- [tailwindcss](https://tailwindcss.com)
|
|
||||||
- Deployed on [Vercel](https://vercel.com?utm_source=envshare)
|
|
||||||
- Data stored on [Upstash](https://upstash.com?utm_source=envshare)
|
|
||||||
|
|
||||||
## Deploy your own
|
|
||||||
|
|
||||||
Detailed instructions can be found [here](https://envshare.dev/deploy)
|
|
||||||
|
|
||||||
All you need is a Redis database on Upstash and a Vercel account. Click the
|
|
||||||
button below to clone and deploy:
|
|
||||||
|
|
||||||
[](https://vercel.com/new/clone?demo-title=EnvShare&demo-description=Simple%20Next.js%20%2B%20Upstash%20app%20to%20share%20environment%20variables%20securely%20using%20AES-GCM%20encryption.&demo-url=https%3A%2F%2Fenvshare.dev%2F&demo-image=%2F%2Fimages.ctfassets.net%2Fe5382hct74si%2F5SaFBHXp5FBFJbsTzVqIJ3%2Ff0f8382369b7642fd8103debb9025c11%2Fenvshare.png&project-name=EnvShare&repository-name=envshare&repository-url=https%3A%2F%2Fgithub.com%2Fchronark%2Fenvshare&from=templates&integration-ids=oac_V3R1GIpkoJorr6fqyiwdhl17)
|
|
||||||
|
|
||||||
|
|
||||||
|
|
||||||
## Configuration
|
|
||||||
|
|
||||||
### Environment Variables
|
|
||||||
|
|
||||||
`ENABLE_VERCEL_ANALYTICS` Any truthy value will enable Vercel Analytics. This is turned off by default
|
|
||||||
|
|
||||||
## Contributing
|
|
||||||
|
|
||||||
This repository uses `pnpm` to manage dependencies. Install it using
|
|
||||||
`npm install -g pnpm`
|
|
||||||
|
|
||||||
Please run `pnpm fmt` before committing to format the code.
|
|
||||||
|
|
||||||
## Docs
|
|
||||||
|
|
||||||
Docs in the README are temporary and will be moved to the website soon.
|
|
||||||
|
|
||||||
### API
|
|
||||||
|
|
||||||
#### Store a secret
|
|
||||||
|
|
||||||
**PLEASE NEVER EVER UPLOAD UNENCRYPTED SECRETS.**
|
|
||||||
|
|
||||||
This endpoint is only meant to store **already encrypted** secrets. The
|
|
||||||
encrypted secrets are stored in plain text.
|
|
||||||
|
|
||||||
```sh-session
|
|
||||||
$ curl -XPOST -s https://envshare.dev/api/v1/secret -d "already-encrypted-secret"
|
|
||||||
```
|
|
||||||
|
|
||||||
You can add optional headers to configure the ttl and number of reads.
|
|
||||||
|
|
||||||
```sh-session
|
|
||||||
$ curl -XPOST -s https://envshare.dev/api/v1/secret -d "already-encrypted-secret" -H "envshare-ttl: 3600" -H "envshare-reads: 10"
|
|
||||||
```
|
|
||||||
|
|
||||||
- Omitting the `envshare-ttl` header will set a default of 30 days. Disable the
|
|
||||||
ttl by setting it to 0. (`envshare-ttl: 0`)
|
|
||||||
- Omitting the `envshare-reads` header will simply disable it and allow reading
|
|
||||||
for an unlimited number of times.
|
|
||||||
|
|
||||||
This endpoint returns a JSON response with the secret id:
|
|
||||||
|
|
||||||
```json
|
|
||||||
{
|
|
||||||
"data": {
|
|
||||||
"id": "HdPbXgpvUvNk43oxSdK97u",
|
|
||||||
"ttl": 86400,
|
|
||||||
"reads": 2,
|
|
||||||
"expiresAt": "2023-01-19T20:47:28.383Z",
|
|
||||||
"url": "http://envshare.dev/api/v1/secret/HdPbXgpvUvNk43oxSdK97u"
|
|
||||||
}
|
|
||||||
}
|
|
||||||
```
|
|
||||||
|
|
||||||
#### Retrieve a secret
|
|
||||||
|
|
||||||
You need an id to retrieve a secret. The id is returned when you store a secret.
|
|
||||||
|
|
||||||
```sh-session
|
|
||||||
$ curl -s https://envshare.dev/api/v1/secret/HdPbXgpvUvNk43oxSdK97u
|
|
||||||
```
|
|
||||||
|
|
||||||
```json
|
|
||||||
{
|
|
||||||
"data": {
|
|
||||||
"secret": "Hello",
|
|
||||||
"remainingReads": 1
|
|
||||||
}
|
|
||||||
}
|
|
||||||
```
|
|
||||||
25
content/projects/gitea.mdx
Normal file
25
content/projects/gitea.mdx
Normal file
@ -0,0 +1,25 @@
|
|||||||
|
---
|
||||||
|
title: Gitea Instance
|
||||||
|
description: Gitea Aderk Tech - мой собственный git-сервер.
|
||||||
|
date: "2025-04-15"
|
||||||
|
url: https://gitea.aderk.tech
|
||||||
|
published: true
|
||||||
|
---
|
||||||
|
|
||||||
|
[Gitea](https://about.gitea.com/) — это легковесная, self-hosted платформа для управления Git-репозиториями с открытым исходным кодом.
|
||||||
|
Она предоставляет функционал, схожий с GitHub или GitLab, но ориентирована на простоту, минимализм и низкое потребление ресурсов.
|
||||||
|
|
||||||
|
## Функции
|
||||||
|
|
||||||
|
- **Хостинг кода:** Gitea позволяет создавать и управлять репозиториями на основе Git. Он также делает проверку кода невероятно простой и удобной, повышая качество кода для пользователей и предприятий.
|
||||||
|
- **CI/CD:** Gitea имеет интегрированную систему CI/CD, Gitea Actions, которая совместима с GitHub Actions. Пользователи могут создавать рабочие процессы, используя знакомый формат YAML, или использовать более 20 тыс. существующих плагинов.
|
||||||
|
- **Проекты:** Вы можете эффективно управлять требованиями, функциями и ошибками с помощью задач по проблемам, маркировки и досок kanban. Эти инструменты помогают планировать и отслеживать ход разработки, включая ветви, теги, этапы, задания, отслеживание времени и зависимости.
|
||||||
|
- **Пакеты:** Gitea поддерживает более 20 различных видов публичного и частного управления пакетами, включая: Cargo, Chef, Composer, Conan, Conda, Container, Helm, Maven, NPM, NuGet, Pub, PyPI, RubyGems, Vagrant и т. д.
|
||||||
|
|
||||||
|

|
||||||
|
|
||||||
|
### Почему я решил использовать Gitea, а не GitLab?
|
||||||
|
|
||||||
|
- Меньше потребляет ресурсы. А для меня это очень критично.
|
||||||
|
- Легче перенести проекты с GitHub.
|
||||||
|
- Проще в освоении.
|
||||||
@ -1,26 +0,0 @@
|
|||||||
---
|
|
||||||
title: highstorm.app
|
|
||||||
description: Simple, fast, open source custom event tracking
|
|
||||||
date: "2023-05-01"
|
|
||||||
url: https://highstorm.app
|
|
||||||
published: true
|
|
||||||
repository: "chronark/highstorm"
|
|
||||||
|
|
||||||
---
|
|
||||||
|
|
||||||
|
|
||||||
[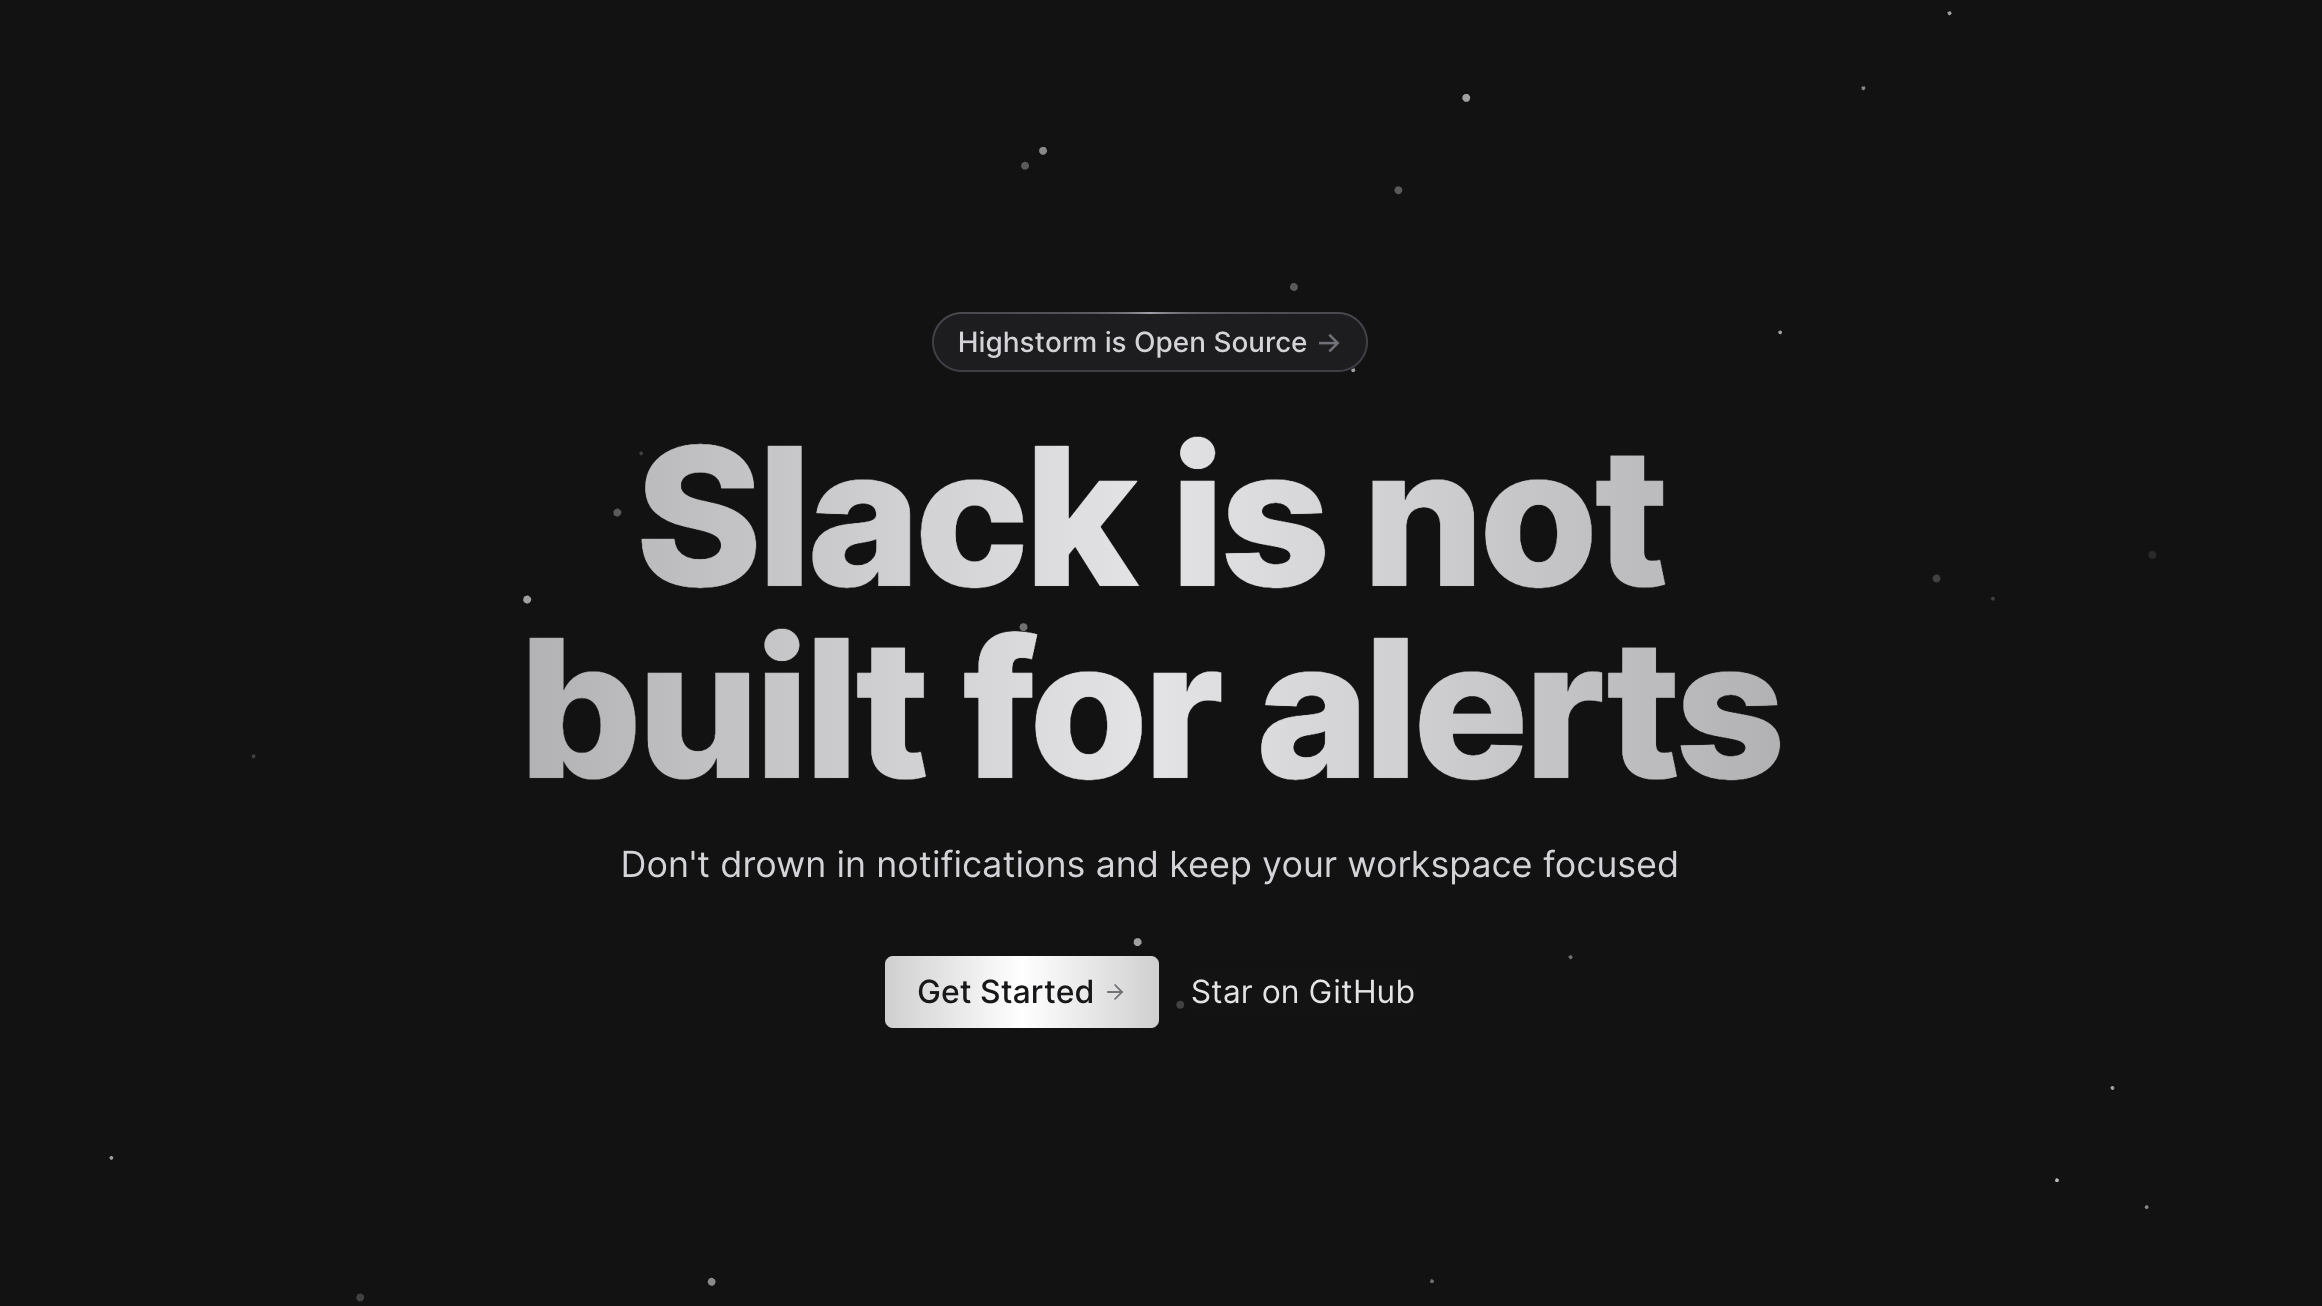](https://highstorm.app)
|
|
||||||
|
|
||||||
Reduce the noise in your Slack workspace by consolidating all your event data into one place, filtering alerts by relevance, and customizing your alert settings to suit your needs.
|
|
||||||
|
|
||||||
###### Consolidate Events
|
|
||||||
Get all your event data in one place to reduce alert noise
|
|
||||||
|
|
||||||
###### Stay Focused
|
|
||||||
Keep your Slack workspace focused on what's important
|
|
||||||
|
|
||||||
###### Customizable Settings
|
|
||||||
Customize your alert settings to suit your unique needs
|
|
||||||
|
|
||||||
###### Clear Overview
|
|
||||||
Get a clear overview of all your alerts in one place
|
|
||||||
24
content/projects/nightdev.mdx
Normal file
24
content/projects/nightdev.mdx
Normal file
@ -0,0 +1,24 @@
|
|||||||
|
---
|
||||||
|
title: nightdevsociety.dev
|
||||||
|
description: Социальная сеть и дашбоард для начинающих ребят в it (Beta).
|
||||||
|
date: "2025-05-18"
|
||||||
|
url: https://nightdevsociety.dev
|
||||||
|
published: true
|
||||||
|
---
|
||||||
|
|
||||||
|
Социальная сеть, форум и git-хостинг для начинающих талантливых ребят в it (Beta).
|
||||||
|
|
||||||
|
Регистрация исключительно по приглашению.
|
||||||
|
|
||||||
|

|
||||||
|
|
||||||
|
## Функции
|
||||||
|
|
||||||
|
- **Хостинг кода:** На git.nightdevsociety.dev - Хостинг Git-репозиториев, совместимый с GitHub и GitLab для удобства обсуждения кода или конфигов.
|
||||||
|
- **Проекты:** Вы можете эффективно управлять требованиями, функциями и ошибками с помощью задач по проблемам, маркировки и досок kanban. Эти инструменты помогают планировать и отслеживать ход разработки, включая ветви, теги, этапы, задания, отслеживание времени и зависимости.
|
||||||
|
- **Пакеты:** Gitea поддерживает более 20 различных видов публичного и частного управления пакетами, включая: Cargo, Chef, Composer, Conan, Conda, Container, Helm, Maven, NPM, NuGet, Pub, PyPI, RubyGems, Vagrant и т. д.
|
||||||
|
- **Форум:** На форуме можно обсуждать или/и начинать свои проекты.
|
||||||
|
|
||||||
|
## Плюсы
|
||||||
|
- **Стараемся не душнить**: да, стараемся не душнить, чтобы новичкам было проще подключаться.
|
||||||
|
- **Удаляем hr'ов**: да, стараемся удалять hr'ов и не позволяем им залезть к нам.
|
||||||
@ -1,15 +0,0 @@
|
|||||||
---
|
|
||||||
title: planetfall.io
|
|
||||||
description: I'm building a SAAS providing global latency monitoring for your APIs and websites from edge locations around the world. Have you ever wondered how fast your API is in any part of the world? Planetfall allows you to find out and monitor it continuously.
|
|
||||||
date: "2023-04-01"
|
|
||||||
url: https://planetfall.io
|
|
||||||
published: true
|
|
||||||
|
|
||||||
---
|
|
||||||
|
|
||||||
|
|
||||||
[](https://planetfall.io)
|
|
||||||
|
|
||||||
Planetfall is a SaaS platform that provides global latency monitoring and synthetic monitoring for APIs. With over 60 regions to monitor from, customers can gain insights into the true performance of their API by checking latency from around the world.
|
|
||||||
Planetfall offers custom timeouts, threshold notifications, and real-time alerts for potential performance issues. Additionally, customers can create custom status pages to share with their customers, which can display availability and latency for every region. Planetfall offers a free tier that includes 100k checks per month and scales as customers grow. Overall, Planetfall helps customers stay in control of their API's performance, improve communication with their customers, and build trust.
|
|
||||||
|
|
||||||
@ -1,36 +0,0 @@
|
|||||||
---
|
|
||||||
title: QStash
|
|
||||||
description: QStash is a fully managed serverless queue and messaging service designed for the serverless era.
|
|
||||||
date: "2022-07-18"
|
|
||||||
url: https://upstash.com/qstash
|
|
||||||
published: true
|
|
||||||
|
|
||||||
---
|
|
||||||
|
|
||||||
QStash is an HTTP based messaging and scheduling solution for the serverless and edge runtimes.
|
|
||||||
|
|
||||||
- 100% serverless, no stateful connections required. Messages are pushed to your API.
|
|
||||||
- At-least-once delivery guaranteed to any public API
|
|
||||||
- Pubsub via topics
|
|
||||||
- Delay message delivery
|
|
||||||
- Message deduplication
|
|
||||||
- Scheduling via CRON
|
|
||||||
|
|
||||||
|
|
||||||
Formally, QStash is a message queue and task scheduler designed for serverless runtimes. Informally, QStash is a glue for your serverless functions.
|
|
||||||
|
|
||||||
There was a perception serverless was only good for simple tasks. Not anymore. People build powerful systems with serverless stack. Powerful systems are composed of multiple components. Communication among those components is a big engineering problem. There are already great solutions for this problem. But we think existing solutions do not fit in serverless space. Either they are too complex or not designed to work with stateless runtimes. So we want a solution which (is):
|
|
||||||
|
|
||||||
- Works anywhere including serverless and edge.
|
|
||||||
- Messaging as a service with no backend for users to run.
|
|
||||||
- Lightweight, easy to understand, requires nothing to learn.
|
|
||||||
- Price scales to zero.
|
|
||||||
|
|
||||||
Let's talk about a real world example. We have an e-commerce app and we want to send an informational email after each purchase. We have a service (an API route) for new purchases (newPurchase) and a second service for sending emails and notifications (sendEmail). We can call the sendEmail service from the newPurchase service. But what if the call fails? Should we wait for the response and retry? What if too many calls congest the sendEmail service and the service does not respond on time? You need to handle all these cases in your newPurchase service. Moreover, when you change the contract of sendEmail service; you have to update your newPurchase service too.
|
|
||||||
|
|
||||||
If you use QStash in the above example, you simply send a request to QStash from the newPurchase service. QStash will queue the request and call the sendEmail service. If the service does not respond, QStash will retry with a backoff strategy. The latency of sendEmail service will not affect the newPurchase service, because it will not wait for a response from the sendEmail service. QStash decouples the newPurchase and sendEmail services. You can update both services independently as long as you keep the message format compatible.
|
|
||||||
|
|
||||||
With QStash, you can add delays to the requests. Send an email 3 days after the shipment to remind the customer to add a review. You can also schedule tasks. You can send the requests with a CRON expression, so it will be run repetitively.
|
|
||||||
|
|
||||||
|
|
||||||
To learn more about QStash, visit [upstash.com/qstash](upstash.com/qstash).
|
|
||||||
39
content/projects/robotfire.mdx
Normal file
39
content/projects/robotfire.mdx
Normal file
@ -0,0 +1,39 @@
|
|||||||
|
---
|
||||||
|
title: Robot Fire
|
||||||
|
description: Robot Fire - это шутер от первого лица на Unity. Делал с целью поиграть с друзьями.
|
||||||
|
date: "2024-01-16"
|
||||||
|
repository: robotfireopenteam/robotfire
|
||||||
|
published: true
|
||||||
|
---
|
||||||
|
|
||||||
|
EnvShare is a simple tool to share environment variables securely. It uses
|
||||||
|
**AES-GCM** to encrypt your data before sending it to the server. The encryption
|
||||||
|
key never leaves your browser.
|
||||||
|
|
||||||
|
## Features
|
||||||
|
|
||||||
|
- **Shareable Links:** Share your environment variables securely by sending a
|
||||||
|
link
|
||||||
|
- **End-to-End Encryption:** AES-GCM encryption is used to encrypt your data
|
||||||
|
before sending it to the server
|
||||||
|
- **Limit number of reads:** Limit the number of times a link can be read
|
||||||
|
- **Auto Expire:** Automatically expire links and delete data after a certain
|
||||||
|
time
|
||||||
|
|
||||||
|
|
||||||
|
|
||||||
|

|
||||||
|
|
||||||
|
|
||||||
|
## Built with
|
||||||
|
|
||||||
|
### Frontend
|
||||||
|
- [Next.js](https://nextjs.org)
|
||||||
|
- [tailwindcss](https://tailwindcss.com)
|
||||||
|
|
||||||
|
### Backend
|
||||||
|
- [Golang](https://go.dev)
|
||||||
|
- [Gin](https://gin-gonic.com/)
|
||||||
|
|
||||||
|
### DataBase
|
||||||
|
- PostgreSQL
|
||||||
@ -1,46 +0,0 @@
|
|||||||
---
|
|
||||||
title: Vercel Terraform Provider
|
|
||||||
description: A Terraform provider for Vercel. It has been deprecated it when Vercel rolled out their official provider.
|
|
||||||
date: "2021-03-16"
|
|
||||||
repository: chronark/terraform-provider-vercel
|
|
||||||
url: https://registry.terraform.io/providers/chronark/vercel/latest
|
|
||||||
published: true
|
|
||||||
---
|
|
||||||
|
|
||||||
|
|
||||||
|
|
||||||
Back in the day when Vercel didn't have an official Terraform provider, I wrote one.
|
|
||||||
I needed to manage my Vercel projects and especially sync environment variables from different cloud providers.
|
|
||||||
Terraform was great to provision some postgres databases on digital ocean, but there was no way to sync the credentials with Vercel.
|
|
||||||
|
|
||||||
```hcl
|
|
||||||
terraform {
|
|
||||||
required_providers {
|
|
||||||
vercel = {
|
|
||||||
source = "registry.terraform.io/chronark/vercel"
|
|
||||||
version = ">=0.10.3"
|
|
||||||
}
|
|
||||||
}
|
|
||||||
}
|
|
||||||
|
|
||||||
provider "vercel" {
|
|
||||||
token = "<YOUR_TOKEN>"
|
|
||||||
}
|
|
||||||
|
|
||||||
resource "vercel_project" "my_project" {
|
|
||||||
name = "project-via-terraform"
|
|
||||||
git_repository {
|
|
||||||
type = "github"
|
|
||||||
repo = "chronark/terraform-provider-vercel"
|
|
||||||
}
|
|
||||||
}
|
|
||||||
```
|
|
||||||
|
|
||||||
It was a fun project and I learned a lot about Terraform and Vercel's API.
|
|
||||||
It gave me the opportunity to contribute to the Terraform ecosystem and my appreciation for the work that the Terraform team does is immense.
|
|
||||||
|
|
||||||
There have been quite a few individuals and teams that have used this provider and I am happy that it has been useful to you.
|
|
||||||
|
|
||||||
Now that Vercel have stepped in, I have decided to [deprecate](https://twitter.com/chronark_/status/1517759708983177218) this one on April 23rd 2022.
|
|
||||||
|
|
||||||
Please use the [official provider](https://registry.terraform.io/providers/vercel/vercel/latest) instead.
|
|
||||||
@ -1,13 +0,0 @@
|
|||||||
---
|
|
||||||
title: unkey.dev
|
|
||||||
description: Unkey is an open source API Key management solution. It allows you to create, manage and validate API Keys for your users. It’s built with security and speed in mind.
|
|
||||||
date: "2023-07-01"
|
|
||||||
url: https://unkey.dev
|
|
||||||
published: true
|
|
||||||
repository: chronark/unkey
|
|
||||||
---
|
|
||||||
|
|
||||||
|
|
||||||
[](https://unkey.dev)
|
|
||||||
|
|
||||||
Unkey is an open source API Key management solution. It allows you to create, manage and validate API Keys for your users. It’s built with security and speed in mind.
|
|
||||||
@ -1,8 +0,0 @@
|
|||||||
---
|
|
||||||
title: Upstash Auth Analytics
|
|
||||||
description: A library to record and analyse Auth.js user behaviour
|
|
||||||
url: https://console.upstash.com/ratelimit
|
|
||||||
repository: upstash/auth-analytics
|
|
||||||
---
|
|
||||||
|
|
||||||
TODO:
|
|
||||||
@ -1,115 +0,0 @@
|
|||||||
---
|
|
||||||
title: "@upstash/cli"
|
|
||||||
description: A CLI to provision and manage Upstash resources, including Redis and Kafka databases.
|
|
||||||
date: "2022-05-16"
|
|
||||||
repository: upstash/cli
|
|
||||||
published: true
|
|
||||||
|
|
||||||
---
|
|
||||||
|
|
||||||
|
|
||||||
Manage Upstash resources in your terminal or CI.
|
|
||||||
|
|
||||||

|
|
||||||
|
|
||||||

|
|
||||||
[](https://npmjs.org/package/@upstash/cli)
|
|
||||||
|
|
||||||
# Installation
|
|
||||||
|
|
||||||
## npm
|
|
||||||
|
|
||||||
You can install upstash's cli directly from npm
|
|
||||||
|
|
||||||
```bash
|
|
||||||
npm i -g @upstash/cli
|
|
||||||
```
|
|
||||||
|
|
||||||
It will be added as `upstash` to your system's path.
|
|
||||||
|
|
||||||
## Compiled binaries:
|
|
||||||
|
|
||||||
`upstash` is also available from the
|
|
||||||
[releases page](https://github.com/upstash/upstash-cli/releases/latest) compiled
|
|
||||||
for windows, linux and mac (both intel and m1).
|
|
||||||
|
|
||||||
# Usage
|
|
||||||
|
|
||||||
```bash
|
|
||||||
> upstash
|
|
||||||
|
|
||||||
Usage: upstash
|
|
||||||
Version: development
|
|
||||||
|
|
||||||
Description:
|
|
||||||
|
|
||||||
Official cli for Upstash products
|
|
||||||
|
|
||||||
Options:
|
|
||||||
|
|
||||||
-h, --help - Show this help.
|
|
||||||
-V, --version - Show the version number for this program.
|
|
||||||
-c, --config <string> - Path to .upstash.json file
|
|
||||||
|
|
||||||
Commands:
|
|
||||||
|
|
||||||
auth - Login and logout
|
|
||||||
redis - Manage redis database instances
|
|
||||||
kafka - Manage kafka clusters and topics
|
|
||||||
team - Manage your teams and their members
|
|
||||||
|
|
||||||
Environment variables:
|
|
||||||
|
|
||||||
UPSTASH_EMAIL <string> - The email you use on upstash
|
|
||||||
UPSTASH_API_KEY <string> - The api key from upstash
|
|
||||||
```
|
|
||||||
|
|
||||||
## Authentication
|
|
||||||
|
|
||||||
When running `upstash` for the first time, you should log in using
|
|
||||||
`upstash auth login`. Provide your email and an api key.
|
|
||||||
[See here for how to get a key.](https://docs.upstash.com/redis/howto/developerapi#api-development)
|
|
||||||
|
|
||||||
As an alternative to logging in, you can provide `UPSTASH_EMAIL` and
|
|
||||||
`UPSTASH_API_KEY` as environment variables.
|
|
||||||
|
|
||||||
## Usage
|
|
||||||
|
|
||||||
Let's create a new redis database:
|
|
||||||
|
|
||||||
```bash
|
|
||||||
> upstash redis create --name=my-db --region=eu-west-1
|
|
||||||
Database has been created
|
|
||||||
|
|
||||||
database_id a3e25299-132a-45b9-b026-c73f5a807859
|
|
||||||
database_name my-db
|
|
||||||
database_type Pay as You Go
|
|
||||||
region eu-west-1
|
|
||||||
type paid
|
|
||||||
port 37090
|
|
||||||
creation_time 1652687630
|
|
||||||
state active
|
|
||||||
password 88ae6392a1084d1186a3da37fb5f5a30
|
|
||||||
user_email andreas@upstash.com
|
|
||||||
endpoint eu1-magnetic-lacewing-37090.upstash.io
|
|
||||||
edge false
|
|
||||||
multizone false
|
|
||||||
rest_token AZDiASQgYTNlMjUyOTktMTMyYS00NWI5LWIwMjYtYzczZjVhODA3ODU5ODhhZTYzOTJhMTA4NGQxMTg2YTNkYTM3ZmI1ZjVhMzA=
|
|
||||||
read_only_rest_token ApDiASQgYTNlMjUyOTktMTMyYS00NWI5LWIwMjYtYzczZjVhODA3ODU5O_InFjRVX1XHsaSjq1wSerFCugZ8t8O1aTfbF6Jhq1I=
|
|
||||||
|
|
||||||
|
|
||||||
You can visit your database details page: https://console.upstash.com/redis/a3e25299-132a-45b9-b026-c73f5a807859
|
|
||||||
|
|
||||||
Connect to your database with redis-cli: redis-cli -u redis://88ae6392a1084d1186a3da37fb5f5a30@eu1-magnetic-lacewing-37090.upstash.io:37090
|
|
||||||
```
|
|
||||||
|
|
||||||
## Output
|
|
||||||
|
|
||||||
Most commands support the `--json` flag to return the raw api response as json,
|
|
||||||
which you can parse and automate your system.
|
|
||||||
|
|
||||||
```bash
|
|
||||||
> upstash redis create --name=test2113 --region=us-central1 --json | jq '.endpoint'
|
|
||||||
|
|
||||||
"gusc1-clean-gelding-30208.upstash.io"
|
|
||||||
```
|
|
||||||
@ -1,100 +0,0 @@
|
|||||||
---
|
|
||||||
title: Upstash Core Analytics
|
|
||||||
description: Low level utilities to build analytics tools on top of Redis.
|
|
||||||
date: "2023-02-13"
|
|
||||||
url: https://console.upstash.com/ratelimit
|
|
||||||
repository: upstash/core-analytics
|
|
||||||
published: true
|
|
||||||
|
|
||||||
---
|
|
||||||
|
|
||||||
|
|
||||||
This library offers some low level building blocks to record and analyze custom events in Redis.
|
|
||||||
It's main purpose is to provide a simple way to record and query events in Redis without having to worry about the underlying data structure so we can build more advanced analytics features on top of it.
|
|
||||||
|
|
||||||
## Quickstart
|
|
||||||
|
|
||||||
|
|
||||||
1. Create a redis database
|
|
||||||
|
|
||||||
Go to [console.upstash.com/redis](https://console.upstash.com/redis) and create
|
|
||||||
a new global database.
|
|
||||||
|
|
||||||
After creating the db, copy the `UPSTASH_REDIS_REST_URL` and `UPSTASH_REDIS_REST_TOKEN` to your `.env` file.
|
|
||||||
|
|
||||||
3. Install `@upstash/analytics` in your project
|
|
||||||
|
|
||||||
```bash
|
|
||||||
npm install @upstash/analytics @upstash/redis
|
|
||||||
```
|
|
||||||
|
|
||||||
4. Create an analytics client
|
|
||||||
|
|
||||||
```ts
|
|
||||||
import { Analytyics } from "@upstash/analytics";
|
|
||||||
import { Redis } from "@upstash/redis";
|
|
||||||
|
|
||||||
const analytics = new Analytics({
|
|
||||||
redis: Redis.fromEnv(),
|
|
||||||
window: "1d",
|
|
||||||
});
|
|
||||||
```
|
|
||||||
|
|
||||||
|
|
||||||
5. Ingest some events
|
|
||||||
|
|
||||||
An event consists of a `time` field and any additional key-value pairs that you can use to record any information you want.
|
|
||||||
|
|
||||||
```ts
|
|
||||||
const event = {
|
|
||||||
time: Date.now() // optional (default: Date.now())
|
|
||||||
userId: "chronark",
|
|
||||||
page: "/auth/login",
|
|
||||||
country: "DE",
|
|
||||||
}
|
|
||||||
|
|
||||||
await analytics.ingest("pageviews", event);
|
|
||||||
```
|
|
||||||
|
|
||||||
4. Query your events
|
|
||||||
|
|
||||||
```ts
|
|
||||||
|
|
||||||
const result = await analytics.query("pageviews");
|
|
||||||
|
|
||||||
```
|
|
||||||
|
|
||||||
## Development
|
|
||||||
|
|
||||||
This project uses `pnpm` for dependency management.
|
|
||||||
|
|
||||||
#### Install dependencies
|
|
||||||
|
|
||||||
```bash
|
|
||||||
pnpm install
|
|
||||||
```
|
|
||||||
|
|
||||||
#### Build
|
|
||||||
|
|
||||||
```bash
|
|
||||||
pnpm build
|
|
||||||
```
|
|
||||||
|
|
||||||
|
|
||||||
## Database Schema
|
|
||||||
|
|
||||||
All metrics are stored in Redis `Hash` data types and sharded into buckets based on the `window` option.
|
|
||||||
```
|
|
||||||
@upstash/analytics:{TABLE}:{TIMESTAMP}
|
|
||||||
```
|
|
||||||
- `TABLE` is a namespace to group events together. ie for managing multiple projects int a single database
|
|
||||||
- `TIMESTAMP` is the starting timestamp of each window
|
|
||||||
|
|
||||||
The field of each hash is a serialized JSON object with the user's event data and the value is the number of times this event has been recorded.
|
|
||||||
|
|
||||||
```json
|
|
||||||
{
|
|
||||||
'{"page": "/auth/login","country": "DE"}': 5,
|
|
||||||
'{"page": "/auth/login","country": "US"}': 2
|
|
||||||
}
|
|
||||||
```
|
|
||||||
@ -1,29 +0,0 @@
|
|||||||
---
|
|
||||||
title: "@upstash/edge-flags"
|
|
||||||
description: Feature flags for your edge functions.
|
|
||||||
date: "2022-12-12"
|
|
||||||
url: https://upstash.com/blog/edge-flags-beta
|
|
||||||
repository: upstash/edge-flags
|
|
||||||
published: true
|
|
||||||
|
|
||||||
---
|
|
||||||
|
|
||||||
|
|
||||||
Whether you want to ship without breaking things, run A/B tests or just want to test in production,
|
|
||||||
feature flags are a great way to dynamically change the behaviour of your app without redeploying. We're excited to announce the public
|
|
||||||
beta release of our new feature flagging library: [@upstash/edge-flags](https://github.com/upstash/edge-flags).
|
|
||||||
|
|
||||||
*Edge Flags*, as the name implies, is a feature flag solution built to run at the edge. It is using [Upstash Redis](https://upstash.com/), a globally replicated serverless Redis service, to store configuration and is
|
|
||||||
designed to work with [Next.js](https://nextjs.org) and [Vercel](https://vercel.com). We want to support other frameworks in the future, so if you have a suggestion, please let us know!
|
|
||||||
|
|
||||||
With the ability to toggle features on and off at the edge, you can quickly respond
|
|
||||||
to user feedback and optimize the user experience. Whether you are looking to
|
|
||||||
perform A/B testing, gradually roll out a new feature, or simply have the
|
|
||||||
ability to turn things off in case of an issue, our feature flagging library has
|
|
||||||
you covered.
|
|
||||||
|
|
||||||
|
|
||||||
|
|
||||||
## Reference
|
|
||||||
|
|
||||||
Check out the full announcement on [upstash.com](https://upstash.com/blog/edge-flags-beta) for more details.
|
|
||||||
@ -1,178 +0,0 @@
|
|||||||
---
|
|
||||||
title: "@upstash/kafka"
|
|
||||||
description: A fully typed Kafka client built for Upstash Kafka and HTTP, perfect for serverless and edge runtimes
|
|
||||||
date: "2022-01-08"
|
|
||||||
url: https://upstash.com/kafka
|
|
||||||
repository: upstash/upstash-kafka
|
|
||||||
published: true
|
|
||||||
|
|
||||||
---
|
|
||||||
|
|
||||||
|
|
||||||
An HTTP/REST based Kafka client built on top of
|
|
||||||
[Upstash REST API](https://docs.upstash.com/kafka/rest).
|
|
||||||
|
|
||||||
It is the only connectionless (HTTP based) Kafka client and designed for:
|
|
||||||
|
|
||||||
- Serverless functions (AWS Lambda ...)
|
|
||||||
- Cloudflare Workers (see the example)
|
|
||||||
- Fastly Compute@Edge
|
|
||||||
- Next.js Edge, Remix ...
|
|
||||||
- Client side web/mobile applications
|
|
||||||
- WebAssembly and other environments where HTTP is preferred over TCP
|
|
||||||
connections.
|
|
||||||
|
|
||||||
# Installation
|
|
||||||
|
|
||||||
```bash
|
|
||||||
npm install @upstash/kafka
|
|
||||||
```
|
|
||||||
|
|
||||||
# Quickstart
|
|
||||||
|
|
||||||
## Auth
|
|
||||||
|
|
||||||
1. Go to [upstash](https://console.upstash.com/kafka) and select your database.
|
|
||||||
2. Copy the `REST API` secrets at the bottom of the page
|
|
||||||
|
|
||||||
```typescript
|
|
||||||
import { Kafka } from "@upstash/kafka"
|
|
||||||
|
|
||||||
const kafka = new Kafka({
|
|
||||||
url: "<UPSTASH_KAFKA_REST_URL>",
|
|
||||||
username: "<UPSTASH_KAFKA_REST_USERNAME>",
|
|
||||||
password: "<UPSTASH_KAFKA_REST_PASSWORD>",
|
|
||||||
})
|
|
||||||
```
|
|
||||||
|
|
||||||
## Produce a single message
|
|
||||||
|
|
||||||
```typescript
|
|
||||||
const p = kafka.producer()
|
|
||||||
const message = { hello: "world" } // Objects will get serialized using `JSON.stringify`
|
|
||||||
const res = await p.produce("<my.topic>", message)
|
|
||||||
const res = await p.produce("<my.topic>", message, {
|
|
||||||
partition: 1,
|
|
||||||
timestamp: 12345,
|
|
||||||
key: "<custom key>",
|
|
||||||
headers: [{ key: "traceId", value: "85a9f12" }],
|
|
||||||
})
|
|
||||||
```
|
|
||||||
|
|
||||||
## Produce multiple messages.
|
|
||||||
|
|
||||||
The same options from the example above can be set for every message.
|
|
||||||
|
|
||||||
```typescript
|
|
||||||
const p = kafka.producer()
|
|
||||||
const res = await p.produceMany([
|
|
||||||
{
|
|
||||||
topic: "my.topic",
|
|
||||||
value: { hello: "world" },
|
|
||||||
// ...options
|
|
||||||
},
|
|
||||||
{
|
|
||||||
topic: "another.topic",
|
|
||||||
value: "another message",
|
|
||||||
// ...options
|
|
||||||
},
|
|
||||||
])
|
|
||||||
```
|
|
||||||
|
|
||||||
## Consume
|
|
||||||
|
|
||||||
The first time a consumer is created, it needs to figure out the group
|
|
||||||
coordinator by asking the Kafka brokers and joins the consumer group. This
|
|
||||||
process takes some time to complete. That's why when a consumer instance is
|
|
||||||
created first time, it may return empty messages until consumer group
|
|
||||||
coordination is completed.
|
|
||||||
|
|
||||||
```typescript
|
|
||||||
const c = kafka.consumer()
|
|
||||||
const messages = await c.consume({
|
|
||||||
consumerGroupId: "group_1",
|
|
||||||
instanceId: "instance_1",
|
|
||||||
topics: ["test.topic"],
|
|
||||||
autoOffsetReset: "earliest",
|
|
||||||
})
|
|
||||||
```
|
|
||||||
|
|
||||||
More examples can be found in the
|
|
||||||
[docstring](https://github.com/upstash/upstash-kafka/blob/main/pkg/consumer.ts#L265)
|
|
||||||
|
|
||||||
## Commit manually
|
|
||||||
|
|
||||||
While `consume` can handle committing automatically, you can also use
|
|
||||||
`Consumer.commit` to manually commit.
|
|
||||||
|
|
||||||
```typescript
|
|
||||||
const consumerGroupId = "mygroup"
|
|
||||||
const instanceId = "myinstance"
|
|
||||||
const topic = "my.topic"
|
|
||||||
|
|
||||||
const c = kafka.consumer()
|
|
||||||
const messages = await c.consume({
|
|
||||||
consumerGroupId,
|
|
||||||
instanceId,
|
|
||||||
topics: [topic],
|
|
||||||
autoCommit: false,
|
|
||||||
})
|
|
||||||
|
|
||||||
for (const message of messages) {
|
|
||||||
// message handling logic
|
|
||||||
|
|
||||||
await c.commit({
|
|
||||||
consumerGroupId,
|
|
||||||
instanceId,
|
|
||||||
offset: {
|
|
||||||
topic: message.topic,
|
|
||||||
partition: message.partition,
|
|
||||||
offset: message.offset,
|
|
||||||
},
|
|
||||||
})
|
|
||||||
}
|
|
||||||
```
|
|
||||||
|
|
||||||
## Fetch
|
|
||||||
|
|
||||||
You can also manage offsets manually by using `Consumer.fetch`
|
|
||||||
|
|
||||||
```typescript
|
|
||||||
const c = kafka.consumer()
|
|
||||||
const messages = await c.fetch({
|
|
||||||
topic: "greeting",
|
|
||||||
partition: 3,
|
|
||||||
offset: 42,
|
|
||||||
timeout: 1000,
|
|
||||||
})
|
|
||||||
```
|
|
||||||
|
|
||||||
## Examples
|
|
||||||
|
|
||||||
See [/examples](https://github.com/upstash/upstash-kafka/tree/main/examples) as
|
|
||||||
well as various examples in the docstrings of each method.
|
|
||||||
|
|
||||||
# Contributing
|
|
||||||
|
|
||||||
## Requirements
|
|
||||||
|
|
||||||
- [nodejs](https://nodejs.org) v14.x or higher
|
|
||||||
- [pnpm](https://pnpm.io/installation)
|
|
||||||
|
|
||||||
## Setup
|
|
||||||
|
|
||||||
0. Install dependencies using `pnpm install`
|
|
||||||
1. Create a kafka instance on upstash.
|
|
||||||
[docs](https://docs.upstash.com/kafka#create-a-kafka-cluster)
|
|
||||||
2. Create the following topics: `blue`, `red`, `green`.
|
|
||||||
[docs](https://docs.upstash.com/kafka#create-a-topic)
|
|
||||||
|
|
||||||
The partitions or retention settings don't matter at this time.
|
|
||||||
|
|
||||||
3. Create `.env` file with your kafka secrets `cp .env.example .env`
|
|
||||||
|
|
||||||
## Running tests
|
|
||||||
|
|
||||||
```bash
|
|
||||||
pnpm test
|
|
||||||
```
|
|
||||||
@ -1,21 +0,0 @@
|
|||||||
---
|
|
||||||
title: "@upstash/qstash"
|
|
||||||
description: A typescript client and consumer for QStash.
|
|
||||||
date: "2022-07-18"
|
|
||||||
url: https://upstash.com/qstash
|
|
||||||
repository: upstash/sdk-qstash-ts
|
|
||||||
published: true
|
|
||||||
---
|
|
||||||
|
|
||||||
|
|
||||||
@upstash/qstash is the official client and consumer for [QStash](https://chronark.com/projects/qstash).
|
|
||||||
|
|
||||||
QStash is the message broker between your serverless apps. You send an HTTP
|
|
||||||
request to QStash, that includes a destination, a payload and optional settings.
|
|
||||||
We durably store your message and will deliver it to the destination API via
|
|
||||||
HTTP. In case the destination is not ready to receive the message, we will retry
|
|
||||||
the message later, to guarentee at-least-once delivery.
|
|
||||||
|
|
||||||
```bash
|
|
||||||
npm install @upstash/qstash
|
|
||||||
```
|
|
||||||
@ -1,10 +0,0 @@
|
|||||||
---
|
|
||||||
title: Upstash Ratelimit Analytics
|
|
||||||
description: Near realtime analytics for your ratelimits. Integrated into the @upstash/ratelimit library.
|
|
||||||
repository: upstash/ratelimit"
|
|
||||||
url: https://console.upstash.com/ratelimit
|
|
||||||
published: true
|
|
||||||
|
|
||||||
---
|
|
||||||
|
|
||||||
TODO:
|
|
||||||
@ -1,49 +0,0 @@
|
|||||||
---
|
|
||||||
title: "@upstash/ratelimit"
|
|
||||||
description: Ratelimiting library for serverless and edge runtimes. Built on top of Upstash Redis.
|
|
||||||
date: "2022-06-06"
|
|
||||||
url: https://upstash.com/blog/upstash-ratelimit
|
|
||||||
repository: upstash/ratelimit
|
|
||||||
published: true
|
|
||||||
|
|
||||||
---
|
|
||||||
|
|
||||||
In today's digital age, serverless computing has become increasingly popular due to its scalability and cost-efficiency. One of the challenges of serverless computing is to manage resources efficiently, and one critical aspect of this is rate limiting. Rate limiting is a technique that limits the number of requests a client can make to a server over a given period. This technique can prevent abuse, improve performance, and reduce costs. One npm package that helps implement rate limiting for serverless applications is @upstash/ratelimit, built on top of Upstash Redis.
|
|
||||||
|
|
||||||
Upstash is a managed Redis-compatible database service designed for serverless applications.
|
|
||||||
|
|
||||||
`@upstash/ratelimit` is an npm package that provides serverless rate limiting using Upstash Redis. The package offers a simple API that can be used to limit the number of requests a client can make within a given time frame. The following algorithms are supported:
|
|
||||||
|
|
||||||
- Fixed window
|
|
||||||
- Sliding window
|
|
||||||
- Leaky bucket
|
|
||||||
|
|
||||||
|
|
||||||
Using `@upstash/ratelimit` is straightforward. First, you need to install the package using npm:
|
|
||||||
|
|
||||||
```bash
|
|
||||||
npm install @upstash/ratelimit @upstash/redis
|
|
||||||
```
|
|
||||||
Then, you can use it in your application:
|
|
||||||
|
|
||||||
```ts
|
|
||||||
import { Ratelimit } from "@upstash/ratelimit"
|
|
||||||
import { Redis } from "@upstash/redis"
|
|
||||||
|
|
||||||
const ratelimit = new Ratelimit({
|
|
||||||
redis: new Redis({
|
|
||||||
url: "",
|
|
||||||
token: ""
|
|
||||||
}),
|
|
||||||
limiter: Ratelimit.slidingWindow(10, "10s"),
|
|
||||||
analytics: true
|
|
||||||
})
|
|
||||||
|
|
||||||
|
|
||||||
// Check if the client has exceeded the rate limit
|
|
||||||
const { success } = await ratelimit.limit("identifier")
|
|
||||||
```
|
|
||||||
|
|
||||||
In the code above, we initialize Upstash with our Upstash Redis credentials and define our rate limiting rules. We then call the `limit` function, passing the identifier. The function returns a Promise that resolves with `success` and some other useful data.
|
|
||||||
|
|
||||||
`@upstash/ratelimit` is a useful npm package for serverless rate limiting that simplifies the process of implementing rate limiting for serverless applications. The package is built on top of Upstash Redis, which provides a complete solution for serverless applications. With `@upstash/ratelimit`, serverless developers can easily implement rate limiting, which can help prevent abuse, improve performance, and reduce costs.
|
|
||||||
@ -1,12 +0,0 @@
|
|||||||
---
|
|
||||||
title: React.js CLI
|
|
||||||
description: A CLI React component to interact with Upstash Redis databases.
|
|
||||||
date: "2023-02-05"
|
|
||||||
url: https://upstash.com
|
|
||||||
repository: upstash/react-ui
|
|
||||||
published: true
|
|
||||||
|
|
||||||
---
|
|
||||||
|
|
||||||
|
|
||||||
`@upstash/react-ui` is powering the CLI in your browser on [console.upstash.com](https://console.upstash.com). It allows you to interact with your Upstash Redis database in a simple and intuitive way.
|
|
||||||
@ -1,45 +0,0 @@
|
|||||||
---
|
|
||||||
title: "@upstash/redis"
|
|
||||||
description: A fully typed Redis client built for Upstash Redis and HTTP, perfect for serverless and edge runtimes.
|
|
||||||
date: "2022-03-14"
|
|
||||||
url: https://upstash.com/redis
|
|
||||||
repository: upstash/upstash-redis
|
|
||||||
published: true
|
|
||||||
|
|
||||||
---
|
|
||||||
|
|
||||||
Upstash is a cloud-based service provider that offers a Redis-compatible service. In addition to that, we have also created an npm package called `@upstash/redis`. This package provides a strongly typed Redis client that uses HTTP instead of TCP to communicate with the database, making it perfect for serverless and edge runtimes.
|
|
||||||
|
|
||||||
Redis is a popular open-source, in-memory data structure store that can be used as a database, cache, and message broker. It is commonly used for web applications that require fast data access and manipulation. Redis clients communicate with Redis servers using the Redis protocol over TCP/IP.
|
|
||||||
|
|
||||||
However, in some cases, TCP is not available. For example, edge functions run on cloud platforms, which often block TCP connections for various reasons. This is where `@upstash/redis` comes in handy. Instead of using TCP, it uses HTTP to communicate with the servers.
|
|
||||||
|
|
||||||
The package is designed to be easy to use and provides a simple API for Redis commands. It also includes support for Redis transactions and Lua scripting. It is written in TypeScript, which provides static typing and better code completion in modern editors.
|
|
||||||
|
|
||||||
One of the main benefits of using `@upstash/redis` is that it is strongly typed. This means that you get better type checking and error handling in your code. Additionally, the package is designed to be lightweight and optimized for performance. This makes it an excellent choice for applications that require fast data access and manipulation.
|
|
||||||
|
|
||||||
```ts
|
|
||||||
import { Redis } from "@upstash/redis"
|
|
||||||
|
|
||||||
const redis = new Redis({
|
|
||||||
url: <UPSTASH_REDIS_REST_URL>,
|
|
||||||
token: <UPSTASH_REDIS_REST_TOKEN>,
|
|
||||||
})
|
|
||||||
|
|
||||||
// string
|
|
||||||
await redis.set('key', 'value');
|
|
||||||
let data = await redis.get('key');
|
|
||||||
console.log(data)
|
|
||||||
|
|
||||||
await redis.set('key2', 'value2', {ex: 1});
|
|
||||||
|
|
||||||
// sorted set
|
|
||||||
await redis.zadd('scores', { score: 1, member: 'team1' })
|
|
||||||
data = await redis.zrange('scores', 0, 100 )
|
|
||||||
console.log(data)
|
|
||||||
|
|
||||||
// list
|
|
||||||
await redis.lpush('elements', 'magnesium')
|
|
||||||
data = await redis.lrange('elements', 0, 100 )
|
|
||||||
console.log(data)
|
|
||||||
```
|
|
||||||
@ -1,8 +0,0 @@
|
|||||||
---
|
|
||||||
title: Upstash Web Analytics
|
|
||||||
description: A library to record and analyse web page traffic and user behaviour
|
|
||||||
# repository: upstash/web-analytics
|
|
||||||
published: true
|
|
||||||
---
|
|
||||||
|
|
||||||
Coming soon
|
|
||||||
@ -1,172 +0,0 @@
|
|||||||
---
|
|
||||||
title: "Zod Bird"
|
|
||||||
description: Zodbird is an e2e typed tinybird.co client library for typescript, leveraging zod for type safety and transformations
|
|
||||||
repository: chronark/zod-bird
|
|
||||||
date: "2023-05-21"
|
|
||||||
published: true
|
|
||||||
|
|
||||||
---
|
|
||||||
|
|
||||||
- typesafe
|
|
||||||
- handles building the url params for you
|
|
||||||
- easy transformation of resulting data
|
|
||||||
- built in cache directives for nextjs
|
|
||||||
- built in retry logic for ratelimited requests
|
|
||||||
|
|
||||||
|
|
||||||
```ts
|
|
||||||
import { Tinybird } from "@chronark/zod-bird";
|
|
||||||
import { z } from "zod";
|
|
||||||
|
|
||||||
const tb = new Tinybird({ token: "token" });
|
|
||||||
|
|
||||||
export const getEvents = tb.buildPipe({
|
|
||||||
pipe: "get_events__v1",
|
|
||||||
parameters: z.object({
|
|
||||||
tenantId: z.string(),
|
|
||||||
}),
|
|
||||||
data: z.object({
|
|
||||||
event: z.string(),
|
|
||||||
time: z.number().transform((t) => new Date(t)),
|
|
||||||
}),
|
|
||||||
});
|
|
||||||
|
|
||||||
|
|
||||||
const res = await getEvents({ tenantId: "chronark" })
|
|
||||||
|
|
||||||
// res.data = {event: string, time: Date}[]
|
|
||||||
```
|
|
||||||
|
|
||||||
## Install
|
|
||||||
|
|
||||||
```
|
|
||||||
npm i @chronark/zod-bird
|
|
||||||
```
|
|
||||||
|
|
||||||
|
|
||||||
## Ingesting Data
|
|
||||||
|
|
||||||
```ts
|
|
||||||
// lib/tinybird.ts
|
|
||||||
import { Tinybird } from "./client";
|
|
||||||
import { z } from "zod";
|
|
||||||
|
|
||||||
const tb = new Tinybird({ token: process.env.TINYBIRD_TOKEN! });
|
|
||||||
|
|
||||||
export const publishEvent = tb.buildIngestEndpoint({
|
|
||||||
datasource: "events__v1",
|
|
||||||
event: z.object({
|
|
||||||
id: z.string(),
|
|
||||||
tenantId: z.string(),
|
|
||||||
channelId: z.string(),
|
|
||||||
time: z.number().int(),
|
|
||||||
event: z.string(),
|
|
||||||
content: z.string().optional().default(""),
|
|
||||||
metadata: z.string().optional().default(""),
|
|
||||||
}),
|
|
||||||
});
|
|
||||||
```
|
|
||||||
|
|
||||||
```ts
|
|
||||||
// somewhere.ts
|
|
||||||
import { publishEvent } from "./lib/tinybird";
|
|
||||||
|
|
||||||
await publishEvent({
|
|
||||||
id: "1",
|
|
||||||
tenantId: "1",
|
|
||||||
channelId: "1",
|
|
||||||
time: Date.now(),
|
|
||||||
event: "test",
|
|
||||||
content: "test",
|
|
||||||
metadata: JSON.stringify({ test: "test" }),
|
|
||||||
});
|
|
||||||
```
|
|
||||||
|
|
||||||
|
|
||||||
|
|
||||||
## Querying Endpoints
|
|
||||||
|
|
||||||
```ts
|
|
||||||
// lib/tinybird.ts
|
|
||||||
import { Tinybird } from "./client";
|
|
||||||
import { z } from "zod";
|
|
||||||
|
|
||||||
const tb = new Tinybird({ token: process.env.TINYBIRD_TOKEN! });
|
|
||||||
|
|
||||||
export const getChannelActivity = tb.buildPipe({
|
|
||||||
pipe: "get_channel_activity__v1",
|
|
||||||
parameters: z.object({
|
|
||||||
tenantId: z.string(),
|
|
||||||
channelId: z.string().optional(),
|
|
||||||
start: z.number(),
|
|
||||||
end: z.number().optional(),
|
|
||||||
granularity: z.enum(["1m", "1h", "1d", "1w", "1M"]),
|
|
||||||
}),
|
|
||||||
data: z.object({
|
|
||||||
time: z.string().transform((t) => new Date(t).getTime()),
|
|
||||||
count: z
|
|
||||||
.number()
|
|
||||||
.nullable()
|
|
||||||
.optional()
|
|
||||||
.transform((v) => (typeof v === "number" ? v : 0)),
|
|
||||||
}),
|
|
||||||
});
|
|
||||||
```
|
|
||||||
|
|
||||||
```ts
|
|
||||||
// somewhere.ts
|
|
||||||
import { getChannelActivity } from "./lib/tinybird";
|
|
||||||
|
|
||||||
|
|
||||||
const res = await getChannelActivity({
|
|
||||||
tenantId: "1",
|
|
||||||
channelId: "1",
|
|
||||||
start: 123,
|
|
||||||
end: 1234,
|
|
||||||
granularity: "1h"
|
|
||||||
})
|
|
||||||
|
|
||||||
```
|
|
||||||
`res` is the response from the tinybird endpoint, but now fully typed and the data has been parsed according to the schema defined in `data`.
|
|
||||||
|
|
||||||
## Advanced
|
|
||||||
|
|
||||||
### Caching
|
|
||||||
|
|
||||||
You can add cache directives to each pipe.
|
|
||||||
|
|
||||||
|
|
||||||
#### Disable caching (useful in Next.js where everything is cached by default)
|
|
||||||
|
|
||||||
```ts
|
|
||||||
tb.buildPipe({
|
|
||||||
pipe: "some_pipe__v1",
|
|
||||||
parameters: z.object({
|
|
||||||
hello: z.string()
|
|
||||||
}),
|
|
||||||
data: z.object({
|
|
||||||
response: z.string()
|
|
||||||
}),
|
|
||||||
opts: {
|
|
||||||
cache: "no-store" // <-------- Add this
|
|
||||||
};
|
|
||||||
});
|
|
||||||
|
|
||||||
```
|
|
||||||
|
|
||||||
#### Cache for 15 minutes
|
|
||||||
|
|
||||||
```ts
|
|
||||||
|
|
||||||
tb.buildPipe({
|
|
||||||
pipe: "some_pipe__v1",
|
|
||||||
parameters: z.object({
|
|
||||||
hello: z.string()
|
|
||||||
}),
|
|
||||||
data: z.object({
|
|
||||||
response: z.string()
|
|
||||||
}),
|
|
||||||
opts: {
|
|
||||||
revalidate: 900 ;// <-------- Add this
|
|
||||||
};
|
|
||||||
});
|
|
||||||
45
docker-compose.yml
Normal file
45
docker-compose.yml
Normal file
@ -0,0 +1,45 @@
|
|||||||
|
services:
|
||||||
|
next:
|
||||||
|
build:
|
||||||
|
context: .
|
||||||
|
dockerfile: Dockerfile
|
||||||
|
container_name: example-frontend
|
||||||
|
labels:
|
||||||
|
- "traefik.enable=true"
|
||||||
|
- "traefik.http.routers.next.rule=Host(`beta.example`)"
|
||||||
|
- "traefik.http.routers.next.entrypoints=https" # Thats correct
|
||||||
|
- "traefik.http.routers.next.tls=true" # I dont need certresolver here
|
||||||
|
- "traefik.http.services.next.loadbalancer.server.port=3000"
|
||||||
|
environment:
|
||||||
|
- REDIS_HOST=redis
|
||||||
|
- REDIS_PORT=6379
|
||||||
|
- REDIS_PASSWORD=${REDIS_PASSWORD}
|
||||||
|
depends_on:
|
||||||
|
- redis
|
||||||
|
networks:
|
||||||
|
- proxy
|
||||||
|
- backend
|
||||||
|
redis:
|
||||||
|
image: redis:alpine
|
||||||
|
volumes:
|
||||||
|
- redis_data:/data
|
||||||
|
environment:
|
||||||
|
- REDIS_PASSWORD=${REDIS_PASSWORD}
|
||||||
|
command: ["redis-server", "--requirepass", "${REDIS_PASSWORD}"]
|
||||||
|
networks:
|
||||||
|
- backend
|
||||||
|
|
||||||
|
healthcheck:
|
||||||
|
test: ["CMD", "redis-cli", "ping"]
|
||||||
|
interval: 5s
|
||||||
|
timeout: 3s
|
||||||
|
retries: 3
|
||||||
|
|
||||||
|
volumes:
|
||||||
|
redis_data:
|
||||||
|
|
||||||
|
networks:
|
||||||
|
proxy:
|
||||||
|
external: true
|
||||||
|
backend:
|
||||||
|
internal: true
|
||||||
BIN
public/favicon.jpg
Normal file
BIN
public/favicon.jpg
Normal file
Binary file not shown.
|
After Width: | Height: | Size: 86 KiB |
Binary file not shown.
|
Before Width: | Height: | Size: 23 KiB |
Loading…
x
Reference in New Issue
Block a user